Wednesday, October 24, 2012

Sweet Bridezilla's diary: The invitations

Now that almost everybody has gotten the invitation card (except for 3 gentlemen), I can finally have this posted up. I didn't want to post this up when I was done making them, just to keep that little surprise for my guests :)

This DIY invitation is inspired by MANDAKR, found on offbeatbride.com (check it out here)
It was a love at first sight!! Thank you MANDAKR, this is what I want my invitation card to be!! So, I study the whole process, skipped steps that I think that I can omit, and add on materials that is in-line with my wedding theme.
That's when I found out we can't find any freezer paper here! As like what another blogger Chiiiiing said, Malaysia is a land of no freezer paper!! Then I took her advice, this is Malaysia, let's use kertas bungkus! 
Yes, it works just fine :) 

 To begin, you need to do lots and lots of cutting, the kertas bungkus, and the linen cloth. I actually cut the cloth slightly bigger than the kertas bungkus, so that it's "safer" when you do ironing.
Thank you hubby for helping on cutting the paper. That's team work, baby! :)

 The mess that we've created at the living room.
After cutting, it's ironing time. The purpose of heat ironing is to have the kertas bungkus stick onto the cloth, so that it is stiff enough for it to go through the printer.

Next, trim it. I was using an A4 paper as a guideline. My design layout was 2 in a piece of A4.

Now, it's time to have your invitation card print out. What you need to do is put that piece of cloth/paper onto your printer and press print :) Of course you need to get your design done, and remember to copy check. You wouldn't wanna see a typo error on your invitation. Mine I've got my company's copywriter to help on copy checking, hehe... thank you PY!

 This is how it looks like. I've printed a map at the back of the card (on the paper side).
Now it's done. I could have actually printed the recipient's name on the card itself, but I wanted to incorporate the denim element onto my card, so I've decided to have the name printed on a piece of jeans... Frank's used jeans, CLEANED! haha!
 

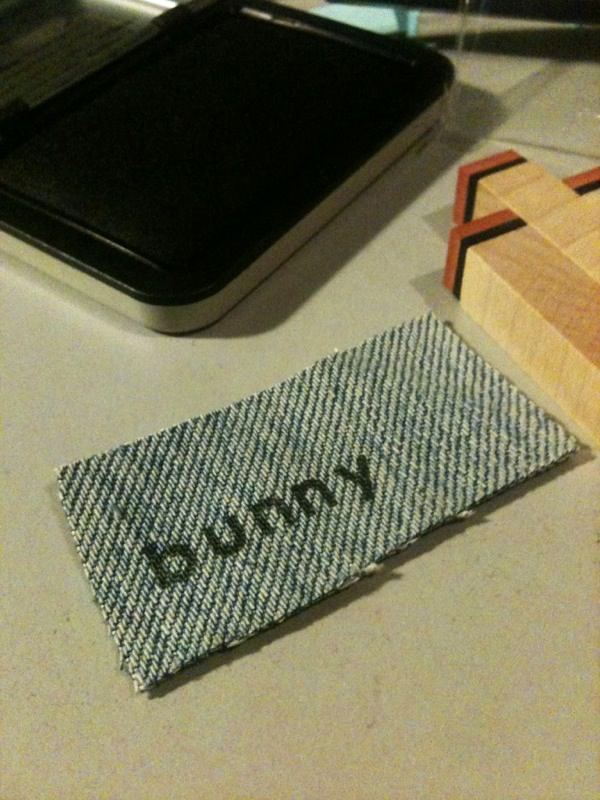
The material is too thick to go through the printer. Thought of hand writing the names, I've tried it, but, NO... it's very untidy. After much thoughts, I bought a set of alphabet stamps, and let's do stamp-stamp!
And to create that Levi's Red Tab kind of look, I used red thread to sew that piece of denim onto the card.

 Take a closer look

 All done, have them inserted into envelopes and ready to send out...  by hand, and by post! The furthest one is to South Australia ^^

  
I love this invitation card, and I hope everybody who received it loves it too!  


Saturday, October 6, 2012

Sweet Bridezilla's diary: Guests of honour


My handmade invitation cards are about 20% (yes!! another 20% more) to completion!!

It took us quite some time to finalize the guests list... because it is just a 60pax intimate wedding party, we are inviting only the closest family members and best friends.

We were contemplating about inviting this person or that person; it is not nice to invite him but not her.... so many concerns...
Anyway, we've gone through that stage, hope our friends & relatives are kind and understanding.

We are thankful, and we are so blessed.

Wednesday, October 3, 2012

Sweet Bridezilla's diary: Not so happening photobook cover

I was very excited when I received the parcel, knowing it's my first photobook of my "pre-wedding photo shoot".

The "pre-wedding photo shoot" was really an unforgettable one. A total DIY project, photographed by a Hong Kong friend, in Hong Kong. Frank & I couldn't thank him enough for such a precious gift for our wedding :)

About 2 and a half months later after we returned from HK, we got a link from our friend - it's our photos!!! Yay!!! So we did a round of photos selection, and I've decided to have part of those photos printed in a photobook. (Ha! So happen that Groupon has got the XXX photobook deal, and I bought 2!)
I've chosen the Ruff n Tuff hard cover for my first album, and the second one is definitely gonna be the Image Wrap hard cover.

[Fast forward]: So, when I open up the box, here it is, it's my first photobook! ...but, wait a minute... this doesn't looks right. I was expecting it to be a hard cover with a die-cut window, and my cover photo will be "framed" behind the window. But what I'm seeing is a debossed rectangular frame on the cover with my cover photo pasted on it. Oooohh NOOOOOoooo.... this is really no class :(

Whatever it is, it is printed, it is a finished product now. I took a deep breath, open up the album and flip through it. Well, the inner page is not bad, I must say I really like it. Now, let's see what I can do to modify the cover. So, this is what I did.

 The original Ruff n Tuff

 I decided to make a frame using this simple black lace

 Need to do some sewing before sticking it onto the cover with hot glue

Ta da!! A new look for my photobook cover

Just to be fair to the XXX photobook company, later I found out it was my fault that I did not study their product properly. They do have another type of photobook called the Window Die-cut Hardcover book (with 2 windows). Hence, the Ruff n Tuff Debossed Hardcover is really just a debossed rectangular frame with your cover photo pasted over it.

Anyway, I like the way it looks now. And I'm excited again waiting for my second book to arrive, the Image Wrap one, hehehe...